Home Construction

How Much Does It Cost to Convert Windows to a Patio Door? 15 Things to Consider Before You Commit

Converting a window to a patio door can be a great way to get your family to spend more time outside—whether it’s barbequing, gardening or playing backyard games.

But contrary to popular belief,  the process isn’t quite as simple as popping out old windows and then securing a new door in their place. Converting windows into patio doors takes careful planning and precision during from demo through installation.

The Jason Project

Costs can also add up depending on the decisions you make and the materials you choose. If you’re toying with the idea of turning your windows into a patio door, here are 15 considerations to keep in mind—and decisions you should make—before you commit. 

1. Decide on the doors. Door will be a big chunk of your budget. There are many varieties to choose from, including French, sliding, multi-slide and bifold patio doors. This can cost anywhere from $500-$20,000. Take the time to look at all the options online, in the store, or better yet in action at a friend or family member’s home, to decide which one you prefer.

2. Ask about an overhang. After considering size, cost and door style, ask the manufacturer their requirement for an overhang or facing to go along with the door. Depending on location, you may need to build an overhang to protect your doors from the elements—or even change the type of door you were considering depending on the manufacturer’s response. If you do need an overhang, a small, shingled mini roof can start at $1,500 and easily climb to tens thousands of dollars depending on the type of construction, finishes and size.  

3. Factor in demo costs. Demolition (inside and out) and debris removal can cost about $1,800 for a 10’x8’ wall. Price will depend on the type of construction—brick is more expensive than siding, for example—and location. Costs can add up, for instance, if manual hauls of debris are necessary because a dumpster isn’t allowed on the property per neighborhood policy.

4. Understand if you need a landing. Per some building codes, a landing outside any exterior doorway that doesn’t open onto a solid surface is required. If code requires you to have a landing outside the door, ask about the cost and required size. For example, a 6’x3’ basic concrete runs about $1,000.

Braes Mansion Project

5. But install a landing nonetheless. We recommend you have a landing, regardless of what the code says. A landing will provide a stable place to stand while one's attention is focused on operating the door. It’s also a good idea because it will help avoid tracking excess dirt and mud inside the house. And, the step up to a doorway can be high—anything above about 7” will be a trip hazard.

(If your new door widths are less than the size of the window or windows you’re replacing, you’re in luck because that means you can skip over several more complicated and expensive steps below. If that’s the case, skip the next step.)

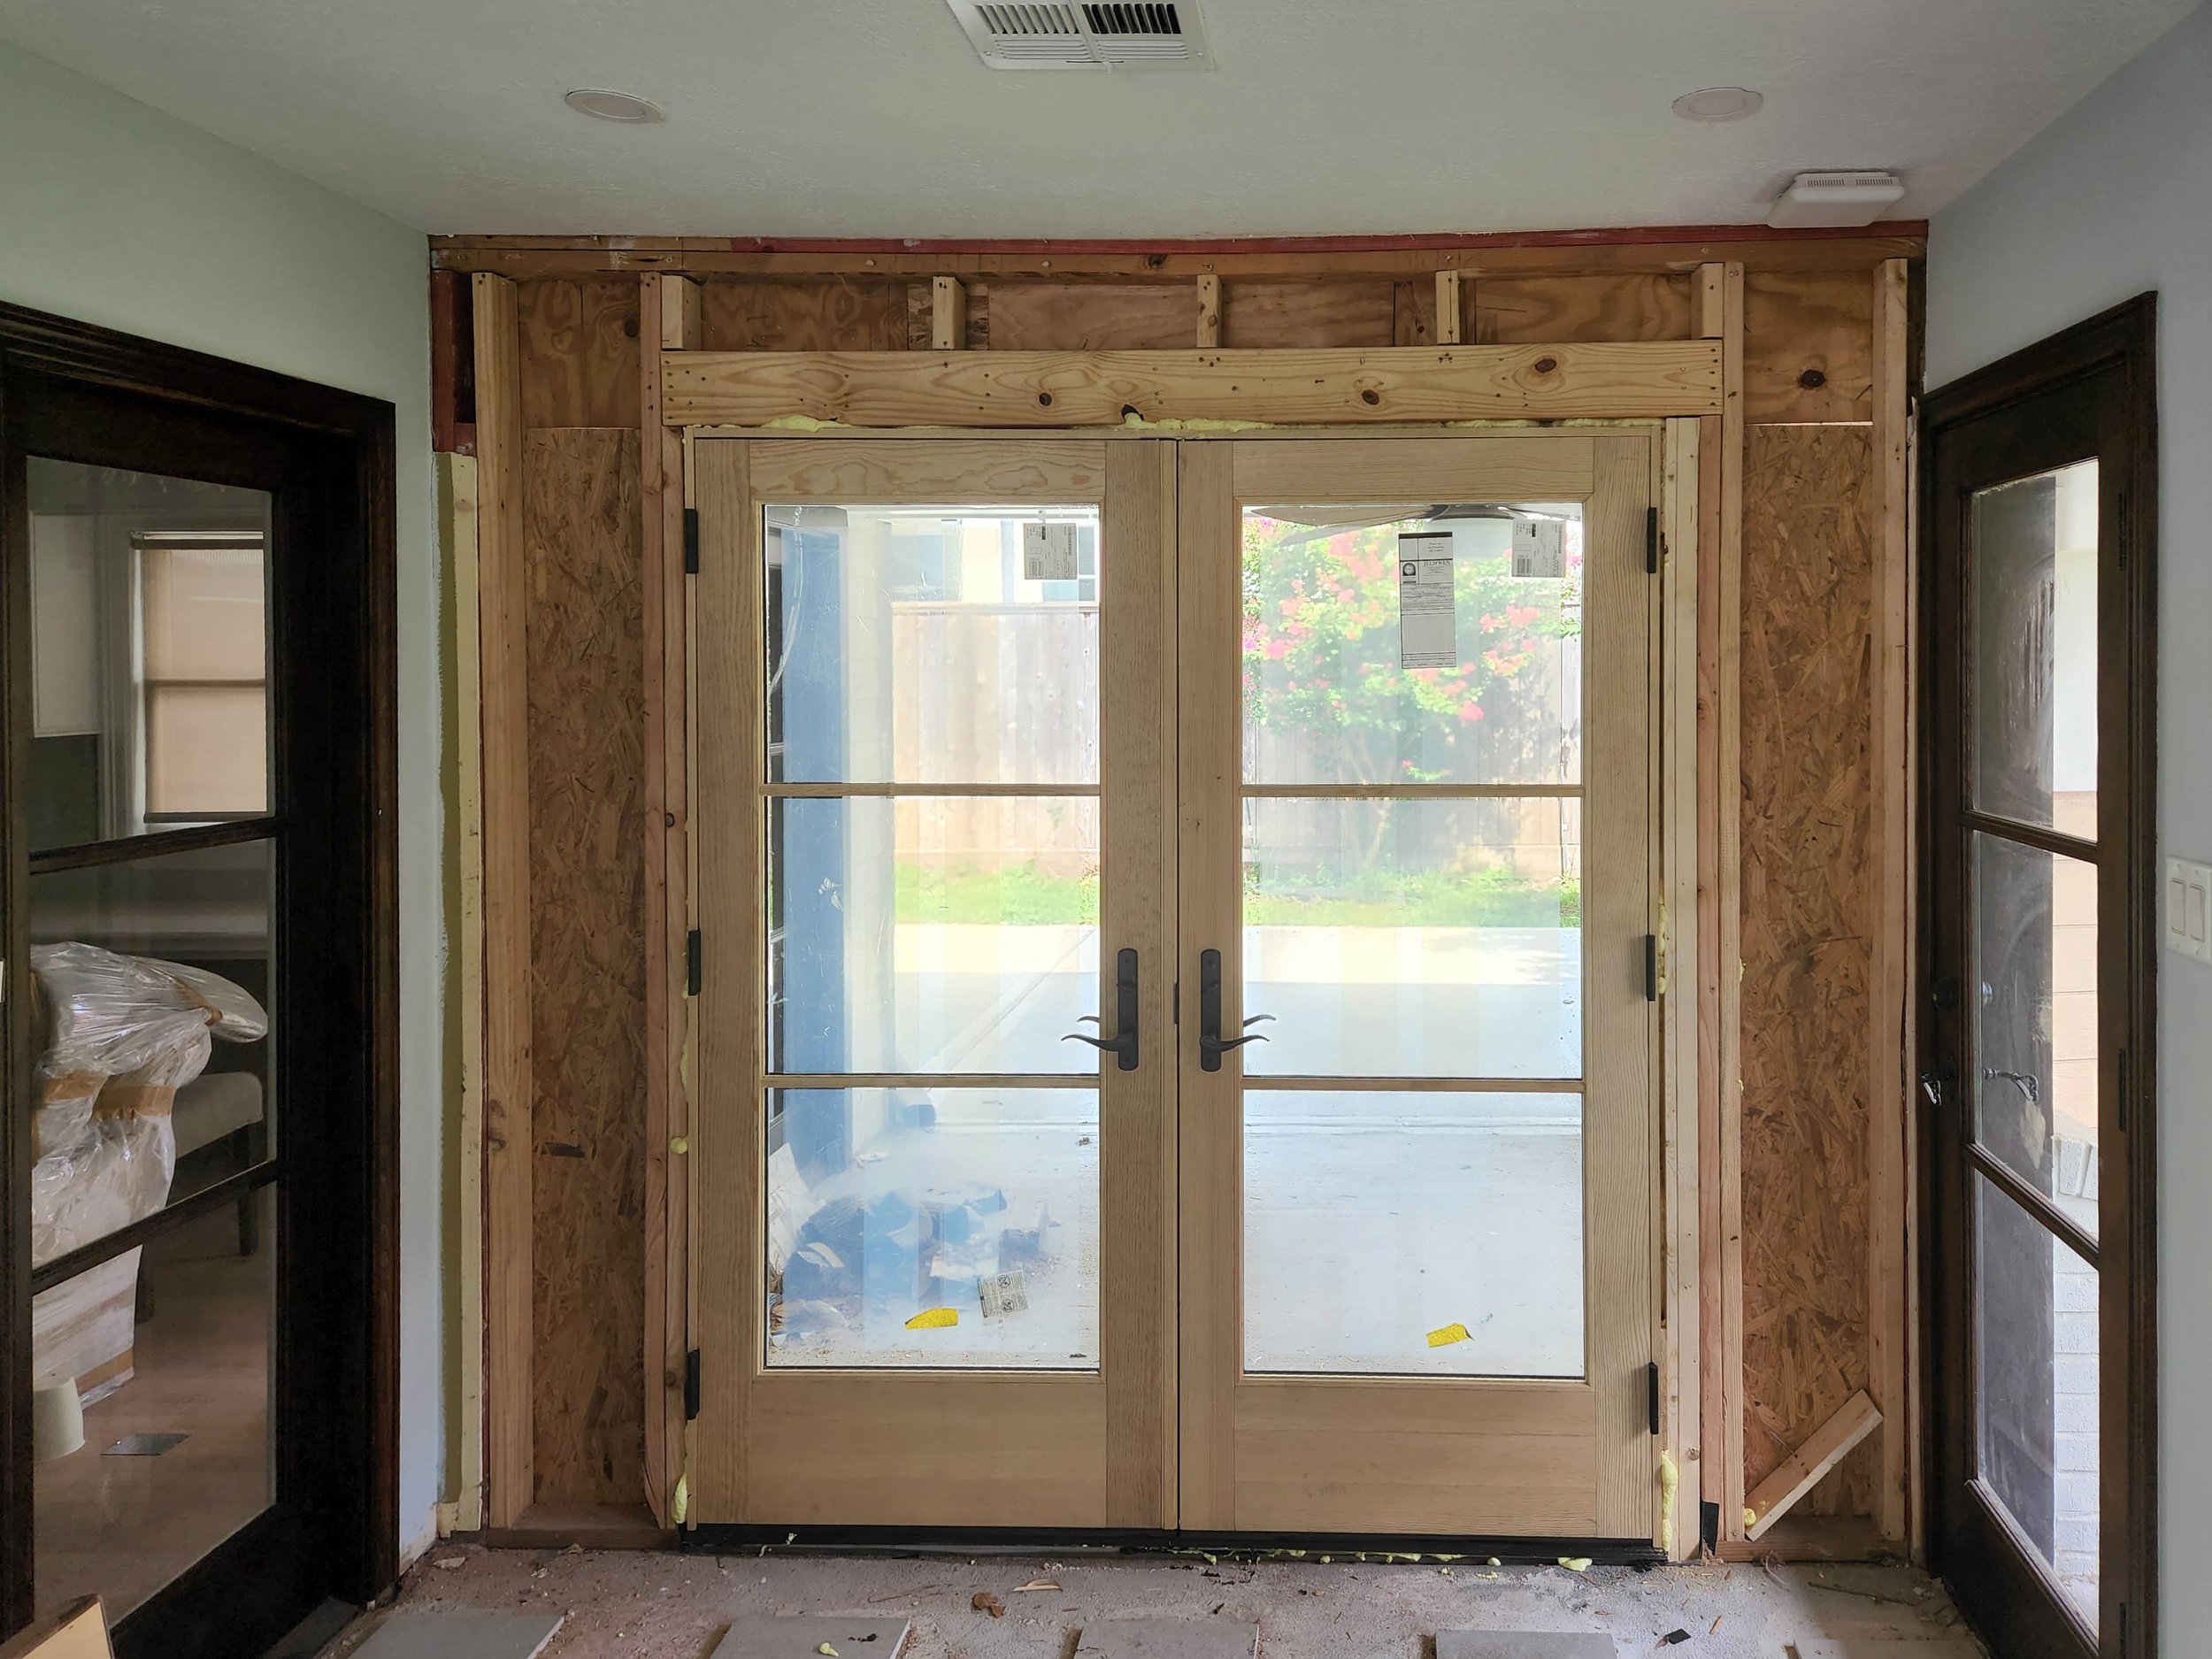
6. Add in new header costs, if needed. Depending on the type of construction and the distance between windows, there’s a high probability you’ll need a new header installed that is designed to bear the load of the wall or structure above. That means the whole area needs to be reframed, at least 2’ from each side of the doors’ rough opening, or the framed opening size into which a door is installed. This is normally 2.5-3” larger than the door size, but it’s model specific, so check with the supplier. The new header needs to covers the entire span of the opening. That will cost anywhere from $1,500 to $3,000 including labor and materials for a 6’x 6’-8” door’s rough opening.

7. Think about plumbing. If there’s plumbing in the area of the new rough opening, you’ll need to relocate or remove the plumbing. Sometimes you’ll be able to see a hose bib, or small faucet, on an exterior wall. In other cases, you won’t know about plumbing until the wall is opened up. Capping this hose bib, modifying it or moving it to a new location can start at $350 with labor and materials. If you don’t have access to the wall from the attic, for example, on the ground floor of a two-story home, be prepared for some surprises.

8. Remember HVAC and outlets. You may need to make adjustments with HVAC and outlets, too. As with plumbing, some of this work will be simple and inexpensive. Moving or canceling an outlet or two can cost around $200 each. But the same caveats apply—often you won’t know what you’re dealing with until the wall is opened up.

9. Choose a quality door sill pan. For the new opening you make with your doors, you’ll most likely need a door pan. It’s a tub the bottom of the door sits in that’s open to the exterior. The water that inevitably gets through door seals, jambs and thresholds is diverted back outside instead of onto your new wood flooring or carpet. This is especially important if you’re facing south or west and lack adequate overhang protection. The cost depends on the quality of the pan. We use custom stainless steel pans that run about $850 for a 6’ pan, installed. 

How a Specs Document Can Transform Your Remodeling Experience

10. Get ready for wall repair. After the new door pan and door are installed, the exterior will need to be trimmed out, or the wall repaired so the new door looks finished like the rest of the house. The price depends on the material your exterior is finished with (siding, stucco, brick). Siding, for example, is often the most economical option. Brick or stone is normally the most costly and could run about $2000. You’ll also need to install a metal lintel, or a piece of metal that spans the space in front of the header and supports the weight of the brick or stone. If you have a one-story home, you can choose to have just siding above the door. But if you have a brick wall over the door, you must install a lintel. 

11. Prepare for painting. Exterior trim, paint and flashing will cost you about $600-700 for a 6’x6’-8” opening on a lap siding wall, or type of siding that’s installed horizontally on your home, such as Hardie Plank, wood, aluminum, or PVC.

12. Doing drywall. Interior drywall, trim, and paint costs about $1,300 for a 6’x6’-8” door. This depends on door casing and baseboard used in the home, the paint and drywall finish level and demo required for framing, electrical and plumbing.

13. Installing the door. Sometimes suppliers have installers of their own. This is a good idea, as suppliers are familiar with the product and your warranty is assured (at least with respect to install). This cost will run about $750, depending on the type of door and the manufacturer. 

14. Putting in a threshold. If you order conventional swinging doors without a threshold, there will be an additional cost. Thresholds can be installed from about $650 for a 6’ double door.

15. Accounting for permitting. Finally, you might encounter additional costs if HOA/Municipality permitting is required or requested for the project.


In all, you’re likely looking at about $6,500 up to $15,000 to convert a window to a patio door—minus the cost of the actual door or doors. Costs will fluctuate based on what’s found behind the walls, any technical complications with the doors, and materials costs. If this works with your budget, then adding a patio door can be a great option.

 

You may also like:

Change is one of the most sensitive topics in construction

Construction has just started on your new custom home when you decide that you want to reorient your kitchen island and make your master bedroom closet just a little bigger.

You may think that making small changes after your home construction has started should be a simple feat. Often, however, that’s not the case. Changes during custom home construction is an especially sensitive topic and it can be fraught with frustration for homeowners.

It’s understandable how someone without an extensive background in construction and design might think changes early on in the construction process shouldn’t be a big deal, especially if the room in question hasn’t been built yet. However, changes—and even what appear to be very minor ones—can affect many other factors that are moving the project forward, some of which are unbeknownst to the homeowner. Changes can be expensive no matter when they happen.

For example, moving a window just three inches to the left might seem simple. But to make that change, the architect and engineers may need to weigh in and other components of the room might need to be shifted or adjusted as well to make the room flow. Even the tiniest change can alter a project timeline and add to the budget.

When it comes to custom home construction, changes, however, almost always naturally occur over the course of a project. That’s also the case, and perhaps even more so, for home remodels and renovations because you only truly know what’s behind the walls of an older home after you open them up.

There are two primary types of design changes on construction projects. One, the owner changed their mind about the design or asks for new or additional work be done. And two, the project can’t be successfully completed unless revisions are made to the initial project design. These changes might happen if there are errors and omissions in plans or specifications, if you have to substitute building materials or construction methods, or if there are code changes. As an owner, you might also run into financial complications and need to scale back your project.

Changes can be frustrating for both homeowners as well as for builders and designers. No one likes to see a worker’s craftsmanship dismantled because of a change that could have been prevented in the first place.

As you move forward with your custom home build, renovation or remodel, know that there are ways in which you can help to minimize the changes you request during your project, and ways in which you can make changes easier when they do happen. By taking these extra steps you can help to ensure your project finishes both on-time and on-budget.

Do your research. To minimize change, spend plenty of time in the planning stages of your project familiarizing yourself with different styles and aesthetics so you’re confident about the design and components you want for your home. Look at images online and in magazines. Many custom homebuilders will also let you visit model homes or homes in progress to get a feel for different design elements. Work closely with your architect and interior designer to nail down as many design decisions as possible before construction starts.

Set realistic expectations. Know that changes will cause delays, sometimes short ones, other times extensive ones based on the number of steps needed to make the change. For example, extra costs come into play because sometimes certain parts of the projects have to stop until the change is made and that might require coordinating with various vendors.

Build change into your budget. Knowing that inevitable changes will cost money, set aside some cash for them during the planning stages of your project so you’re not caught off guard without sufficient funds. A good rule of thumb is 5-10% of your overall budget.

Be transparent. Transparency and efficient communication between all parties is critical. Make sure your builder is involved in all of the choices and the decisions that you’re making.

Ask for a plan review. Ask your designer or builder to review plans and specs. Finding errors or omissions regarding your scope of work that can be addressed or corrected prior to construction starting will save you time and money down the line.

Do you want separate closets or one shared space with an island?

When you build a custom home, you make every space your own, from the entry way to the pantry to your master bedroom closet. Out of all the decisions you’ll make as you’re designing your custom home, an important one is how you’ll configure your master closet. Do you want separate closets or one shared space with an island?

It’s a good idea to think carefully about your master bedroom closet since it’s a spot you’ll spend a good deal of time in each day. In recent years, plenty of well-planned-out storage space has also topped homebuyers’ wish lists, so a solid closet design can help with resale value as well—should you eventually decide to sell your custom home.

There are both pros and cons to having separate closets and a single shared space with an island. The best way to decide is to think about your particular situation, your needs, your budget, and how you want to use your closet space day to day.

Sticking to separate closets

Separate closets can work well if one person has significantly more “stuff” to store than the other. In that situation, the person with fewer clothes might feel overcrowded in a shared closet and could feel happier if they were to have their own personal space.

If the person you’re sharing a closet with has different ideas about tidiness than you do—they’re typically messy while you like a clean closet—sticking to separate spaces can also help stave off arguments or any feelings of resentment.

Arieli Custom Homes Windows in Master Closet.jpg

Separate closets provide more privacy as well ,and they can be a more convenient and less hectic option first thing in the morning when you’re rushing to get ready for work. Having individual closets means that you’re not getting in each other’s way while you’re trying to choose your outfit for the day.

Committing to a shared space

In recent years, however, more and more homes have featured walk-in master bedroom closets as many homeowners have gravitated toward larger closet spaces with a more open feel.

In kitchens, islands can add important extra storage space. It’s the same with closets. Having a shared walk-in closet with an island can add to your storage options, giving you custom-made spots to stash your shoes, belts, and even your jewelry.

Many homeowners like closet islands because they can eliminate the need for a dresser or a bureau, freeing up space in the master bedroom and giving your bedroom a cleaner, more streamlined feel. A closet island can also come in handy as a space for folding clothes or packing luggage as you’re preparing for a trip.

Arieli Custom Homes Island in Master Closet.jpg

For a shared closet with an island, you need a large enough space so the closet doesn’t end up feeling cluttered. Generally, islands work well when they have around 36 inches of space on each side. That translates into a closet space that’s at least 12’ by 12’.

Adding an island to your share closed is also another opportunity to put your design spin on your space. You can choose an interesting finish for your island or top it with an eye-catching granite or a marble slab. Choosing interesting decorative hardware can also make your custom master closet island stand out.

Closet considerations

As you mull over whether to have separate closets or a shared space with an island, it’s a good idea to start by taking an inventory of what items each person has in their wardrobe and needs to store. Think about how much clothing should be hanging — and which items need a full hanging space versus a half space. Also think about what items can be placed in drawers or set on shelves instead.

1971-Arieli-4902 Jason-059-web.jpg

Islands with drawers and dividers can be great for folded items like T-shirts, pants, underwear and lingerie and scarves. In the past year, many people have found themselves buying and wearing more leisure attire, which lends itself well to storage in drawers and on shelves.

With many workplaces now permanently shifting to at least part-time remote work for their employees, for many people, this trend toward more leisure wear could stick. Consider this as you’re making decisions about your custom closet.

Finally, think about how your closet could work in conjunction with other spaces in your new home, like your laundry room. If you decide to have a larger, shared closet, you may also have room for a hidden ironing board so you can do a fast touch-up before getting dressed. An island can also be built with a pull-out hamper inside. 

Whichever you choose – separate closets or a larger, single space with an island – take the time to work with your architect and custom builder team to make sure the final design suits all of your needs. At Arieli Homes, we’ve designed countless custom master closets. We love working with our clients to find the solution that best fits their unique needs.

One-stop-shop builder vs ad hoc home build

With the promise of soon having a house made just for you, building a custom home is an exciting time. But the process can also be time consuming, and sometimes it’s just stressful. One way to help ensure the homebuilding process goes smoothly is to work with a one-stop-shop construction company.

Working with only one company – as opposed to dealing piecemeal with a builder, architect, interior design and other related home building professionals – has multiple benefits, and in the end, it can end up saving you both valuable time and money.

One Stop Shop Company Arieli Custom Homes.jpg

Consider these top six benefits to working with a one-stop-shop construction company or custom homebuilder that oversees your custom home build from start to finish.

1)    You’ll have just one point of contact
As opposed to multiple points of contacts at different companies, you’ll have just one company that can address all of your questions. You won’t have to spend the time chasing down people at a variety of firms. Bid processes for multiple companies will also be eliminated, saving you even more precious time. Because your architect and contractor will be talking to each other throughout the entire process, you won’t have to play the role of middleman.

2)   You’ll avoid countless meetings and paperwork
With just one company, the number of meetings you’ll have to attend as you’re designing and building your custom home will be greatly reduced. Working with fewer companies also means less paperwork that you have to worry about both filling out and then keeping track of.

3)   You get an aligned team
With a one-stop-shop construction company, you’ll have an architect and builder or contractor who have worked together in the past on multiple projects and have formed a close and trusting working relationship. They’ll provide their expertise and input together and cohesively. You’ll see fewer disagreements or hiccups because the architect and builder collaborate well together and their vision for your project will more often than not align. Any problems will be solved with a team-based approach.

custom home Arieli Custon Homes.jpg

4)   Your budget will be carefully considered during the entire process
If you work piece meal, it can be easy to lose track of how much you’re spending in total since you have multiple contracts with a variety of companies. With a one-stop-shop, you have a cohesive look at what you’re spending overall. Design work goes hand-in-hand with the building process as your architect and builder work together to make sure you’re not exceeding your budget.

5)   Overall costs may be lower
Often, the cost of an architect or a designer is lower when you’re working with a one-stop-shop construction company as opposed to hiring a professional from an independent architect firm. You can put the extra money you would have spent paying for the services of piece meal professionals into extra features for your custom home.

6)   Time delays can be reduced.
Because your architect, engineer and builder are working so closely together when you work with a one-stop-shop, you’re likely to see fewer problems due to scheduling and fewer change orders that could end up delaying progress on your build.

one-stop-shop custom home builders Arieli Custom Homes (2).jpg

As you’re interviewing one-stop-shop custom home builders, one question to ask is about the working relationship between the builder and the architect. How do they work together process-wise, and how long have they been working together?

Many people ultimately do find that working with a one-stop-shop construction company and a builder and architect who are familiar with each other and collaborate well together is a more enjoyable and hassle-free way to build a custom home.

A home builder’s response to the COVID-19 crisis

It wasn’t long ago that experts were marveling at how for the first time ever in the U.S, we slipped into a new decade without a recession. Economists were cautiously optimistic about 2020. Of course, no one could predict the current pandemic.

COVID-19’s impact on the residential construction industry has been sharp, and especially in Houston, where construction had been booming. The coronavirus has changed our world and upended any previous construction industry predictions.

Houston’s residential construction industry has seen its share of setbacks over the last twelve years. Like the rest of the world, Houston was hit by the global economic crisis in 2008. Then, we saw a slew of hurricanes and disastrous floods—from Hurricane Ike to Hurricane Harvey—six flood events since 2008. Thousands of jobs disappeared. Then, we were faced with a shortage of construction workers as residents rushed to rebuild.

Now, in the last month, and almost overnight, the Houston housing industry went from explosive growth to a sharp slowdown. Many areas have seen a total freeze in new projects. At Arieli Custom Homes, we’re thankful that for now we’re still working. Housing construction has been deemed an essential business, and as we continue to work, we’re doing everything we can to keep ourselves, our subcontractors and our clients safe.

We’ve changed operations by:

1)     Meeting with clients and other business partners online or via phone conferencing, whenever possible. Practicing social distancing when we have to have in-person meetings.

2)     Asking our workers to maintain a safe distance from each other whenever reasonably possible.

3)     Reminding our teams to use always good hygiene.

Arieli Custom Homes

As we continue to help our clients realize their dream of owning a custom-built home, we’re aware of the impact of COVID-19 on the residential construction industry and how the pandemic might alter the construction workforce, materials, construction financing, and project costs in general.

We’re optimistic that eventually the market will recover. But at the same time, we’re realistic, and we know there will be hardships along the way.

The construction workforce. Construction isn’t the type of work you can do from home. Much, if not most, of the work we do in custom home building requires close proximity, if not close contact with others. Workers are at risk of being exposed to the virus, of getting sick and of being quarantined at home as they recover. If too many workers fall sick, construction projects could be delayed. Without work, sub-contractors and their families will feel the effects of the loss of income.

Construction materials. The virus could also lead to problems with production, deliveries and the import of goods. Around 80% of the materials used in U.S. construction are made in China. Chinese-made goods will likely rise in price, or we could end up seeing a shortage of construction materials.

Construction financing. With a less rosy economic outlook for the foreseeable future, lenders might perceive too much risk for speculative construction of almost any kind, and they might step back from or cancel approved loans.

Costs. The virus could upend the budget and timeline for ongoing projects and those about the start. Estimates could become moot as a dwindling supply of materials pushes prices up.

Our clients. We understand people’s financial situation may have changed because of the pandemic. Some clients might need to adjust plans to reduce costs, others might need to pause on a project. We have the same concerns and hopes for the future as our clients. We regard our clients as friends, and we’ll be flexible and work to find creative ways to help them preserve or pause their projects.

Arieli Custom Homes

We got into the real estate business during the 2009 economic crisis, and then established our own local family business, Arieli Custom Homes, just before Hurricane Harvey flooded thousands of Houston homes. After Harvey, we were eager to help rebuild our community, where we live with our children.

We Houstonians have been through difficult times together. Now, here we are again, facing an unprecedented unknown. But we are resilient and resourceful. Together, we’ll do everything we can to succeed. We’ll tighten our belts and we’ll push forward, working diligently and lifting each other up along the way.

There are tons of great reasons for women to get into construction

In the last ten years, more women have started working in construction. But unfortunately, it’s still largely a male-dominated field.

Only around 10% of construction workers are women, and of those, just 1% work on job sites—as subcontractors, superintendents or inspectors. More women work in industries like mining and natural resources than in construction.

Percentage+of+women+in+the+industry+in+the+U.S%5E.jpg

So, why the big gender gap in construction? Maybe women think the field is an unappealing one to work in because of the grueling physical tasks required and its often cluttered work environment. Maybe men think women can’t handle the job. Or maybe, it’s a little bit of both.

It’s true that the kind of work that gets done on construction sites is usually physically challenging—installing tiles, climbing scaffolding, or carrying heavy pipes. Other less physically demanding jobs typically require workers to be well-versed in all parts of the construction process and to give instructions to mostly men on a daily basis. For some women, that might sound hard and intimidating.

Yet, at Arieli we often work with amazing women on our projects. We love when we can collaborate with and learn from talented women working in construction.

Over the years, we’ve met plenty of daughters who work side-by-side with their fathers—and wives who work with their husbands—lifting, moving and installing heavy materials. A lot of the women we work with tend to get into the industry because it’s their parent’s or their partner’s business. We’re always quick to encourage women working in construction.

IMG_7616-2 resized.jpg

There are tons of great reasons for women to get into construction, including:

1. Salary. The gender pay gap is significantly smaller in construction occupations, with women earning on average 99.1% of what men make.

2. Diversity. Most industries that were dominated by one gender in the past—chefs or teachers—have changed a lot in the last 20 years, and for the better. Construction is on its way, and the more women who join, the faster the workforce becomes more diverse.

3. Different points of view. It’s always great to have different perspectives on the job. We’ve found that often the women we’ve worked with approach problems from a different angle and can offer a fresh take on problem-solving.

One of the women we work with often is Marisol Suarez, who joins her tile worker father, Manuel, on the job. Manuel starting teaching Marisol his trade when she was little, and she loves the challenge of a picture-perfect installation and seeing results.

“As a woman working in this industry, it can be a challenge,” Marisol says, “but it's awesome to learn new things and feel I can accomplish the same things as a man. It's great working with my dad—he’s a huge inspiration to me—and it’s fun to build.” 

Perhaps the most difficult part of the work, says Marisol, is coming up against male workers who doubt her abilities. But she doesn’t let that stop her. “As long as we work hard and put in the effort, women are just as capable as men,” she says.